Integrate Sofar HYD KTL-3PH inverters into the Home Assistant

I’m writing this article because I was worried for a long time whether I would be able to integrate my PV system into Home Assistant. However, integrating the Sofar system works perfectly.

To integrate a HYD KTL-3PH inverter into Home Assistant, I use the ‘Solarman Stick Logger’ (https://github.com/davidrapan/ha-solarman) integration.

This can be easily installed via HACS. There are already enough instructions for this.

The integration is now configured as follows via Settings, Integrations:
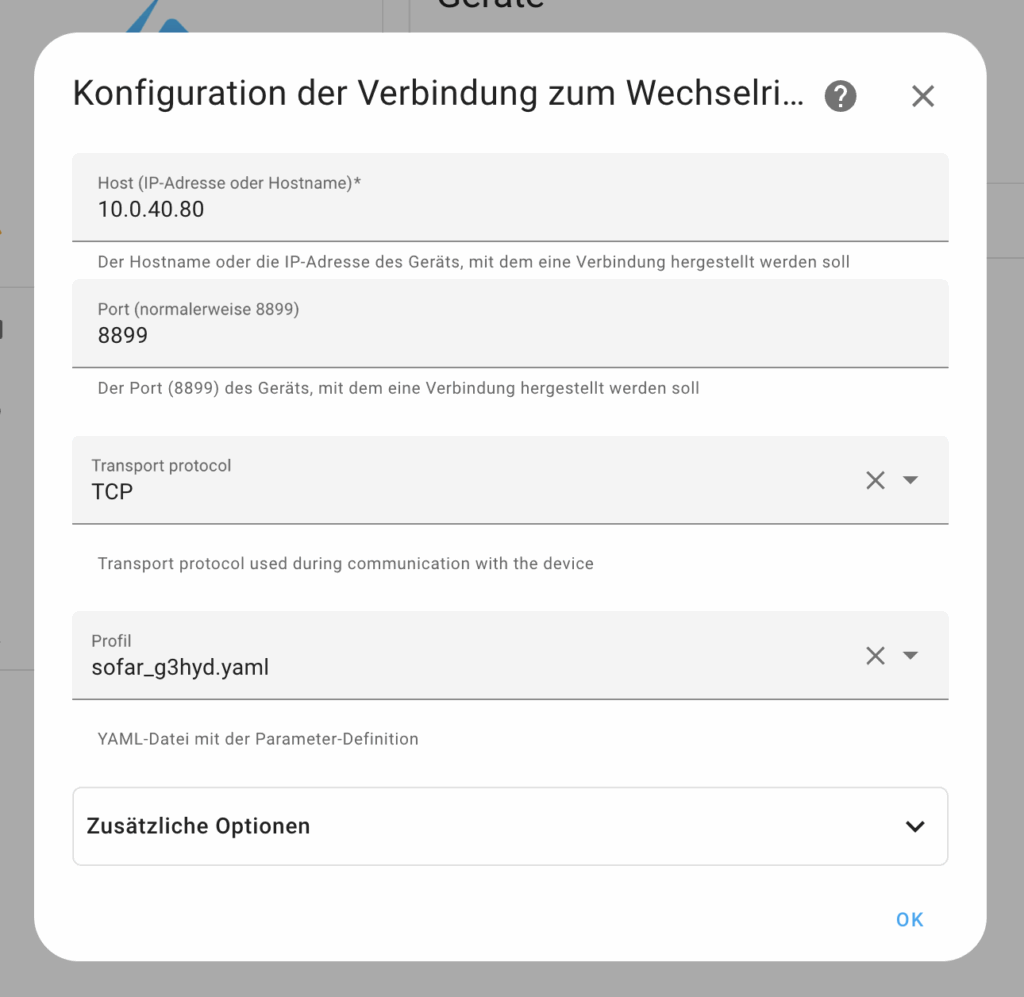
A total of 139 entities are currently read out, so presumably all the sensors relevant to you.

I have created two sensors in configuration.yaml:

Today’s profit from the feed-in

YAML
  - sensor:
      - name: "sofar-export-today-gains"
        unique_id: sofar.complete.gains.day
        unit_of_measurement: ""
        state_class: measurement
        device_class: monetary
        state: >
          {% set export = states('sensor.sofar_today_energy_export') | float(0) %}
          {{ (export * 0.0794) | round(2) }}

The complete profit from the PV system, i.e. including feed-in tariff and self-consumption.

YAML
 - sensor:
      - name: "sofar-today-gains"
        unique_id: sofar.today.gains
        unit_of_measurement: ""
        state: >
          {% set produktion = states('sensor.sofar_today_production') | float(0) %}
          {% set einspeisung = states('sensor.sofar_today_energy_export') | float(0) %}
          {% set netzbezug = states('sensor.sofar_today_energy_import') | float(0) %}
          {% set eigenverbrauch = produktion - einspeisung %}
          {% set eigenwert = eigenverbrauch * 0.29 %}
          {% set einspeisewert = einspeisung * 0.079 %}
          {% set netzkosten = netzbezug * 0.29 %}
          {{ (eigenwert + einspeisewert - netzkosten) | round(2) }}

ESP32 DIY Energy Display with ESPHome

In this guide, you’ll learn how to set up an ESP32 board to display sensor data from Home Assistant and connected I²C sensors on a 20×4 LCD display. This setup is perfect for monitoring solar power production, indoor temperatures, CO₂ levels, and more — all in real-time!

Continue reading “ESP32 DIY Energy Display with ESPHome”

Home Assistant: Convert a negative value to a positive value

My PV system delivers a negative watt value as production at the Shelly. As I didn’t want to change it in the Shelly, I converted this value in the Home Assistant as follows:

Bash
template:
  - sensor:
      - name: "bkw1.watt"
        unique_id: bkw1.watt
        unit_of_measurement: "W"
        state: >
          {% set wert = states('sensor.sensor_shelly_bkw1_power') | float %}
          {{ -wert if wert < 0 else wert }}

Home Assistant & InfluxDB & Grafana: Show device positions on map

To display device positions on a map with history, I first have the positions written to an InfluxDB. I display the data from the InfluxDB with Grafana.

The pivot function must be used for this: The pivot() function in InfluxDB (Flux query language) is used to reshape data by converting a long, narrow table into a wide table. It moves values from a column into multiple columns, making it easier to analyse and visualize time series data.

Example in line 6
from(bucket: "hass")
  |> range(start: v.timeRangeStart, stop: v.timeRangeStop)
  |> filter(fn: (r) => r["_measurement"] == "device_tracker.iphone")
  |> filter(fn: (r) => r["_field"] == "longitude" or r["_field"] == "latitude")
  |> aggregateWindow(every: v.windowPeriod, fn: mean, createEmpty: false)
  |> pivot(rowKey: ["_time"], columnKey: ["_field"], valueColumn: "_value")

Result:

ESPHome: Connect and Query DS18B20 to ESP32

Boot the ESP32 first only with the one_wire config and note down the hardware address from the DS18B20. Then add the second part of the yaml (see below) to monitor the DS18B20.

YAML
esphome:
  name: esp-temp
  friendly_name: esp-temp

esp32:
  board: esp32dev
  framework:
    type: arduino

# Enable logging
logger:

# Enable Home Assistant API
api:
  encryption:
    key: "xxxxxxxxxx"

ota:
  - platform: esphome
    password: "xxxxxxxxxx"

wifi:
  ssid: !secret wifi_ssid
  password: !secret wifi_password

  # Enable fallback hotspot (captive portal) in case wifi connection fails
  ap:
    ssid: "Esp-Temp Fallback Hotspot"
    password: "xxxxxxxxxx"

captive_portal:

# <<<<<<<<< add thsi part to get the hardware adress from the DS18B20 >>>>>>>>>

one_wire:
 - id: bus_one
   platform: gpio
   pin:
    number: 4
    mode:
      input: true
      pullup: true

# <<<<<<<<< add this part after the first boot >>>>>>>>>
sensor:
  - platform: dallas_temp
    address: 0xe200000039xxxxxx
    name: "temp1"
    unit_of_measurement: "°C"
    icon: "mdi:thermometer"
    device_class: "temperature"
    state_class: "measurement"
    accuracy_decimals: 2
  - platform: dallas_temp
    address: 0xf400000035xxxxxx
    name: "temp2"
    unit_of_measurement: "°C"
    icon: "mdi:thermometer"
    device_class: "temperature"
    state_class: "measurement"
    accuracy_decimals: 2
  - platform: dallas_temp
    address: 0x6600000034xxxxxx
    name: "temp3"
    unit_of_measurement: "°C"
    icon: "mdi:thermometer"
    device_class: "temperature"
    state_class: "measurement"
    accuracy_decimals: 2
  - platform: dallas_temp
    address: 0xf000000034xxxxxx
    name: "temp4"
    unit_of_measurement: "°C"
    icon: "mdi:thermometer"
    device_class: "temperature"
    state_class: "measurement"
    accuracy_decimals: 2
  - platform: dallas_temp
    address: 0x5100000035xxxxxx
    name: "temp5"
    unit_of_measurement: "°C"
    icon: "mdi:thermometer"
    device_class: "temperature"
    state_class: "measurement"
    accuracy_decimals: 2

Connect Home Assistant with an external InfluxDB (v2)

I assume that the InfluxDB is already running.

Create a bucket and create an API token:

  1. load data, buckets, create bucket.
  2. API Tokens, Generate API Tokens, Custom API token. A ReadOnly token for the new bucket is sufficient here.

Create database connection in Home Assistant.

We store the InfluxDB-Config in a separate .yaml file. This keeps the configuration.yaml somewhat clearer.

We add the following to configuration.yaml:

configuration.yaml
influxdb: !include influxdb.yaml
Continue reading “Connect Home Assistant with an external InfluxDB (v2)”