This article describes how to establish a Site 2 Site connection with Unifi components from Ubiquiti via Wireguard. As of now (12.2024), the VPN connection must be added manually. However, there no access to the console via SSH is necessary.
Network overview
IP VPN-Gateway and
Site 0  (010-RAT)     10.11.0.1
--------------------------------
Site 1  (011-LST)     10.11.0.2

################################

Networks Site 0 (VPN Server)
10.10.60.0/24
--------------------------------
Netwokrs Site 1
10.0.200.0/24Set up a VPN server
The first step is to start a Wireguard VPN server. No special settings are required here. Ideally the site requires a fixed IP address or a dynamic DNS entry. In addition, the server must have a public IP address, i.e. DS-Lite or similar will not work.

Create remote site
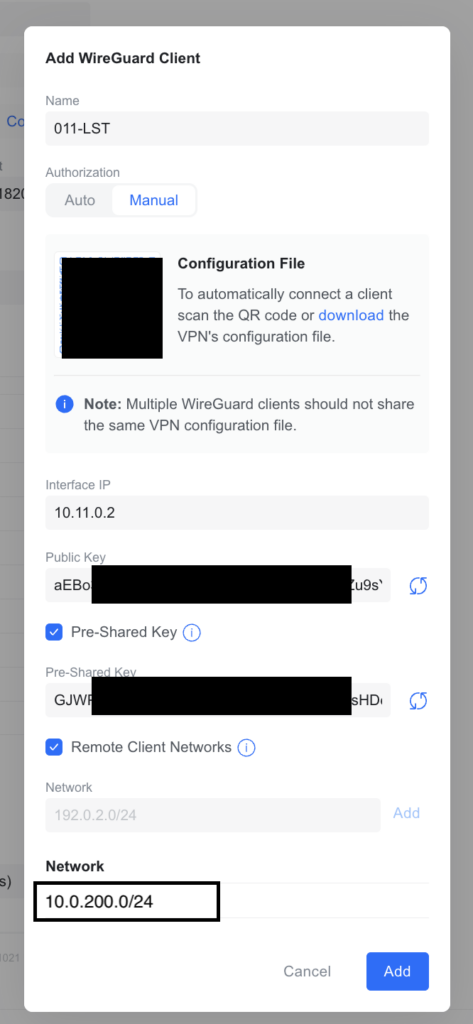
In the next step, the remote site must be created on the VPN server. Here it is important to enter the remote networks that should be reachable using the Site-2-Site VPN in the ‘Remote Client Networks’ setting. This automatically creates the routes on the gateway.
Do not close the window with the public key and the pre-shared key, as the two keys are of course still required.
IMPORTANT: As of now (2024.12) it does not work if the configuration file is used. It is therefore not necessary to download it.
Establishing VPN connection
I mention it again: IMPORTANT: As of now (2024.12) it does not work if the config file is used.
As it does not work with the config files, some copy and paste is now necessary.
Background: In all our tests, incorrect routes were set or the routes terminated incorrectly when using the config files.
Now the public keys must be exchanged.
- copy the public key from the server gateway and paste it on the client gateway.
- copy the public key from the client gateway and paste it on the server gateway.
- copy the pre-shared key from the server gateway and paste it on the client gateway.
- Also adjust the other settings such as IP addresses, netmask and ports.
My humble opinion: A PSK is not absolutely necessary to operate WireGuard securely, as the protocol is also secure without a PSK. However, it does provide an additional layer of protection, especially in scenarios that require maximum security. If the additional effort is manageable, it is recommended to use a PSK.
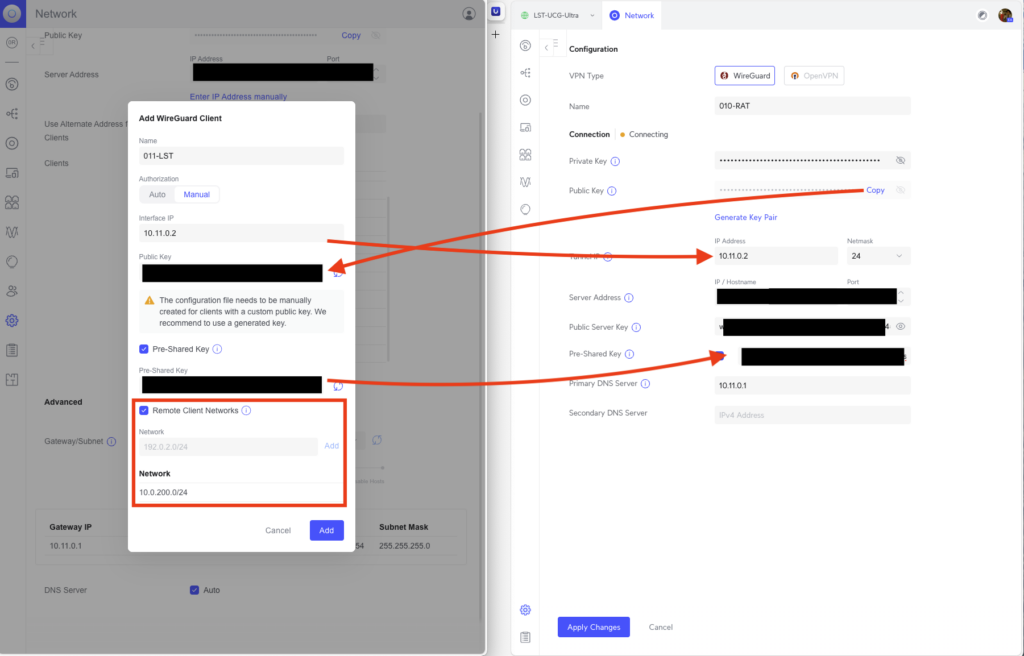
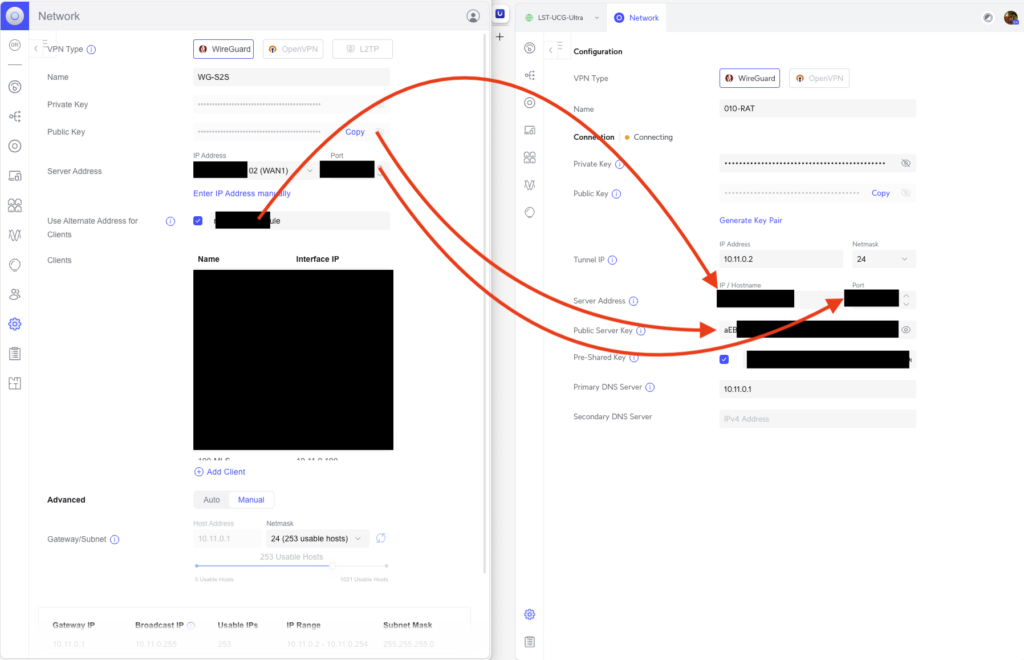
Apply and save the settings. It is best to do this first on the server gateway and then on the client gateway. Do not forget to click ‘Apply Settings’ at the bottom of the page on the server gateway.
Check the connection
The new VPN connection should be established after a few seconds. The remote site must now be visible as a VPN client on the server gateway. In addition, a green dot indicates a successful connection on the client gateway.


It should now also be possible to ping the gateways to each other:
root@LST-UCG-Ultra:~# ping 10.11.0.1
PING 10.11.0.1 (10.11.0.1) 56(84) bytes of data.
64 bytes from 10.11.0.1: icmp_seq=1 ttl=64 time=10.2 msA wg show also shows the VPN connection:
root@LST-UCG-Ultra:~# wg show
interface: wgclt2
  public key: xxxxxxxxxxxx=
  private key: (hidden)
  listening port: 35356

peer: xxxxxxxxxxxx
  preshared key: (hidden)
  endpoint: xxx.xxx.xxx.xxx:xxxxxx
  allowed ips: 0.0.0.0/0
  latest handshake: 4 seconds ago
  latest receive: 4 seconds ago
  transfer: 59.12 KiB received, 131.73 KiB sent
  persistent keepalive: every 1 minute
forced handshake: every 5 secondsCreate routes on the client gateway
Of course, the VPN client or gateway does not yet know the routes to the networks on the server gateway. Therefore, these must be created on the client gateway as ‘static routes’. The ‘next hop’ must be the server gateway.
The routes are created automatically on the server gateway by creating the ‘Remote Clients Networks’.
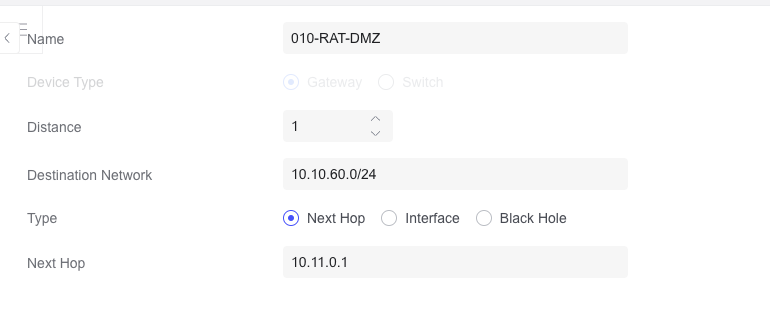
It is a good idea to check whether the route has been created successfully. This can be done via SSH on the client gateway:
root@LST-UCG-Ultra:~# ip route
...
10.10.60.0/24 via 10.11.0.1 dev wgclt2 proto static metric 1
...Check the connection again (2)
The gateway, for example, can now be reached on clients in the remote network:
linus@Mac ~ % ping 10.11.0.1
PING 10.11.0.1 (10.11.0.1): 56 data bytes
64 bytes from 10.11.0.1: icmp_seq=0 ttl=64 time=10.888 ms
64 bytes from 10.11.0.1: icmp_seq=1 ttl=64 time=11.192 msClients in the remote network can now also be reached:
linus@Mac ~ % ping 10.10.60.6
PING 10.10.60.6 (10.10.60.6): 56 data bytes
64 bytes from 10.10.60.6: icmp_seq=0 ttl=63 time=11.877 ms
64 bytes from 10.10.60.6: icmp_seq=1 ttl=63 time=11.241 msSetting up a very important firewall rule!!! !!! !!!
Clients from the network of the server gateway do not yet reach any clients in the network of the client gateway. This is due to the default block rule on the client gateway:
linus@jump:~# ping 10.11.0.3
PING 10.11.0.3 (10.11.0.3) 56(84) bytes of data.
From 10.10.60.1 icmp_seq=1 Destination Host Unreachable
From 10.10.60.1 icmp_seq=2 Destination Host Unreachable
It is important to know: The VPN connection terminates on the client gateway in the ‘Internet’ firewall area. A firewall rule must therefore be created here.
The IP addresses must be adapted accordingly for other environments. I only allow individual hosts. The example may be too open and should be further restricted!
Once the firewall rule has been created, clients from the server gateway network can also reach clients from the client gateway network:
linus@jump:~# ping 10.0.200.71
PING 10.0.200.71 (10.0.200.71) 56(84) bytes of data.
64 bytes from 10.0.200.71: icmp_seq=1 ttl=62 time=10.1 ms
64 bytes from 10.0.200.71: icmp_seq=2 ttl=62 time=10.8 msImportant: Depending on the environment, additional firewall rules must now be created to secure the connections.